
 Don’t you just love a good farmer’s market? I’m lucky to have several near me and each one is a little different. One of my favorite farmer’s markets has an expansive selection of cut flowers. During my last visit I found these beautiful, white hydrangea blooms. I was sold right away and took a bundle home. When I unwrapped them I found a hidden stem that had sagged down and the flower was now shriveled and drooping. Judging by the poor state of the flower, the stem must have been out of the water all morning. For many other flowers that would’ve been the end of it, but not hydrangea flowers, you can bring them back! Follow the steps below when your hydrangeas start to get a little droopy looking, it’ll fluff them right back up and you can enjoy them for a few more days.
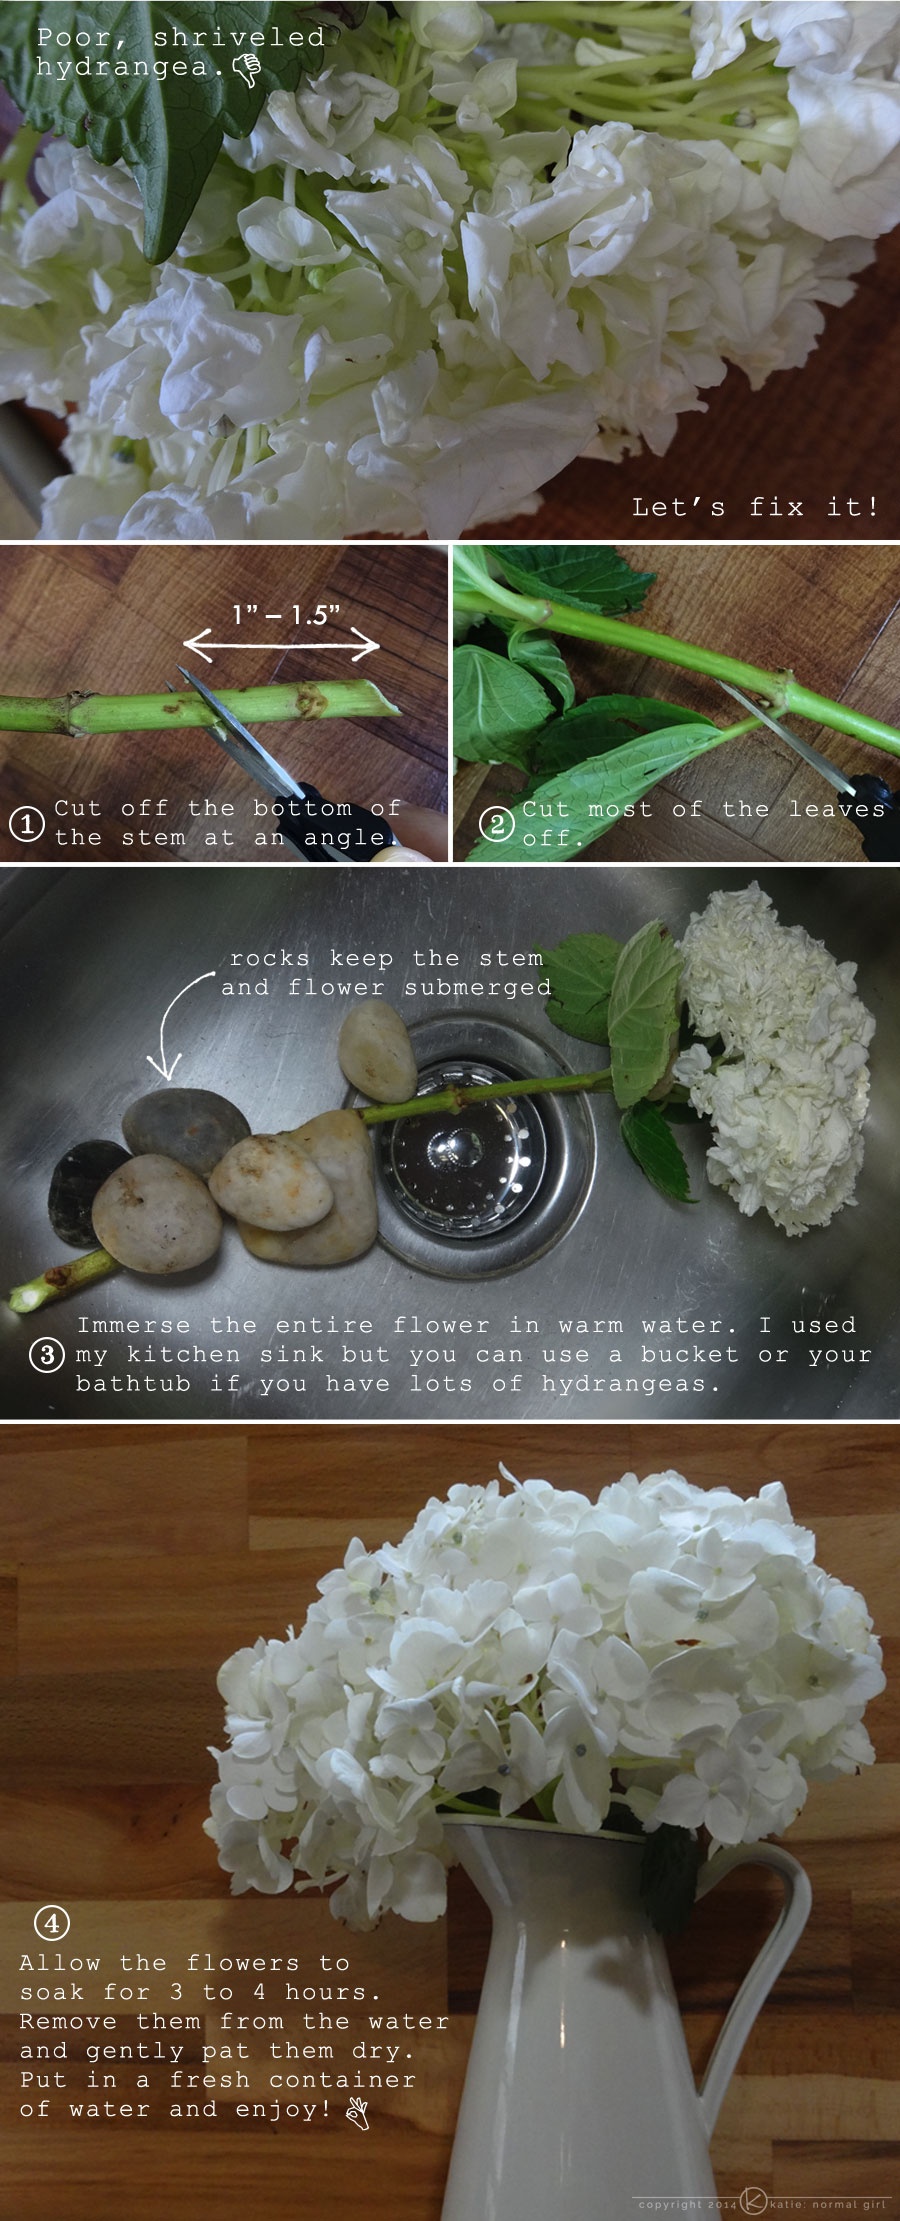
Tag: easy tutorials
Host a Craft-ernoon Party

Today I’m a guest blogger over on Oak & Oats where I’m sharing tips for hosting a craft-ernoon party. I love to host a good party filled with food, crafts and glitter. If you’d like to make these glitter jars and host a party of your own, hop on over and check out this Valentine’s Day craft!

How To Get Pomegranate Seeds Out

Pomegranates are a round fruit that is typically in-season during the cooler months. Depending on where you live it can be anytime from September through April. You eat the flesh covered seeds (also referred to arils, which is actually the red portion that covers the seed) that are found inside, in a white membrane. The seeds have a tart, slightly sour taste that gets sweeter the longer it remains in the fruit. Getting the seeds out of the membrane can be tricky and there are two common methods, the water bowl method and the “beating it with a spoon” method. I prefer the later method. Despite the violent sounding nature of it, using the spoon method will get you a bowl full of seeds that are fully intact and unharmed.
You’ll need:
- a sharp knife
- a wooden spoon
- a medium to large bowl
- an apron/clothing protection
Before you start, you’ll want to put on an apron or drape a tea towel down the front of your clothing to protect it. Juice from the red arils can stain clothing.
Start by using the knife to score the outer skin of the pomegranate and pull it apart. Don’t just cut it in half because you’ll burst some of the arils which will create a mess and you’ll loose some of the seeds you’re working so diligently to harvest.

Next, take half of the pomegranate and pull the sides, stretching it in several places to loosen the seeds. Turn it over in your hand and use the back and side of a wooden spoon to hit the pomegrante. The seeds will start to fall out in your hand, dump them into the bowl and keep on going! Repeat with the other half.
 That’s all there is to it! Now you can enjoy these tasty little delights as a snack by themselves, mixed into yogurt or on top of ice cream. Enjoy!
Want to learn how to cut and prepare more things? Check out Kitchen Skills.
DIY Monogrammed Vases
 I found these fun glasses at a thrift store recently and decided that with a little bit of shine, they would make perfect little flower vases. I just can’t resist fresh cut flowers at the farmer’s market so I’m always in need of a vase or two.
The glasses already had a great etched pattern on them so I just added bits of gold trim and a gold-leafed “G”. The whole process was a lot easier than you might think.
Cutting A Bell Pepper, The Easy Way

You’re a green pepper dicing machine! Now use that diced green pepper in this easy, spaghetti casserole recipe and you’ve got dinner!
Want to learn more things? Check out the Life Skills area.
DIY Sugar Shapes
 Just in time for National Hot Tea Month, sugar shapes! These fun little guys are a cinch to make and are great fun for a party or as a special treat for yourself.
Here’s a few extra tips to get you started:
- If you want to add coloring to your sugar shapes, add a few drops of food color in your teaspoon, then fill the rest of the spoon with plain water and mix with the sugar.
- When selecting a mold, be sure to select one that will make shapes that aren’t too large so you don’t end up with shapes that are three tablespoons of sugar each! Also be careful to select a mold that isn’t too shallow or your shapes may break easily.
- It is a small amount of liquid and doesn’t seem like enough to wet all of the sugar but just keep working at it and it will all come together. In the end you’ll have a relatively dry mixture that presses into the mold really well.
- After pressing the sugar into the mold, use the back of a knife to flatten the shapes.
- The consistency of the mixture is the right combination of dry and wet that you only need to leave the sugar in the mold for a few minutes. If you have really shallow molds (not recommended but it certainly can’t hurt to try) I’d leave them in there for about 10-15 minutes before removing from the mold.
- To get the shapes out, place a flat, rigid surface (like a small cookie sheet or I used a book with foil wrapped around it) on the top of the mold and flip the whole thing over. That way you’re not try to do the quick-flip-slam onto a counter top.
Have a good time making these and stop by for more tea bits all month long!
P.S. This is also a great way to make snow for a gingerbread house!
Calming Oatmeal Facial
Original publish date: January 19, 2012
 Last nerve frayed? Winter weather dried out your skin? No problem. The chamomile in this mask has natural anti-inflammatory properties that will ease your nerves. The honey is a natural humectant, pulling moisture from the air and drawing it to your skin. It will leave you feeling calm and moisturized, and who wouldn’t want that?
You’ll need:
2 1/2 tsp. powdered milk
2 tsp. ground oatmeal
1 tsp. honey
2 chamomile tea bags
Brew…
Place the chamomile tea bags in your favorite mug and pour in 1 cup boiling water. Put a saucer over the cup to trap the escaping steam, which is now infused with the beneficial constituents of the chamomile flowers. Let this steep for 10 minutes.
After the tea is done steeping, remove the tea bags, squeeze out any excess water and place them in the refrigerator to cool.
Mix…
In a small bowl, mix together the powdered milk, ground oatmeal, honey and 2 tsp. of the warm chamomile tea. The warm water will draw out the beneficial elements of the oatmeal and milk, while liquefying the honey, creating a thin paste.
Relax…
Using your fingers, apply the oatmeal mixture to your forehead, then gently sweep down your temples, under your eyes and around your nose. Move your fingers in small circles as you apply more mixture to your cheeks, around your mouth and down your neck.
As you apply the mixture, pay attention to your breathing, take slow, calm breaths. Enjoy the light scent of chamomile and honey as you inhale through your nose and exhale through your mouth. Feel the warm sensation of the oatmeal mixture as you gently spread it over your face.
When you’ve finished applying the mask, rinse your hands in warm water. Get the cooled tea bags from the refrigerator, then lie down with the tea bags placed over your closed eyes. Relax for 20 to 30 minutes and let the chamomile calm your skin and soothe your nerves.
And Rinse.
To rinse the mask off, use warm water and a wash cloth. You do not need to use soap or a cleanser. The mask will rinse clean without them and you want to allow the delicate essences of the chamomile flowers to linger on your skin. The honey will rinse off, leaving your skin feeling moisturized, without clogging your pores. Pat your face dry.
Dispose of (or compost!) the tea bags and finish your facial by sitting with a good book or magazine and sipping on the rest of the chamomile tea that you brewed earlier. If you’ve got the ingredients on hand, this entire process takes less than 45 minutes and can really replenish your mind and body after a draining day.
Happy brewing!
P.S. Who knew? Tea vs. Tisane
Did you know that in order for a beverage to be called “tea,” it actually needs to have tea leaves in it? So all of the herbal brews, like the chamomile tea you just made, are not actually teas…they’re tisanes, water infused with herbs. But seriously, who would ever call them that?? Chamomile tisane?
Gardening Journal: How to Sterilize Clay Pots

Materials Needed: bleach or hydrogen peroxide, scrub brush, rubber gloves
I have always loved the look of mold and calcium buildup on my terra cotta pots. Unfortunately that wonderful patina can mean unsanitary growing conditions for your potted plants. Give your plants their best chance for growth by sterilizing your clay and terra cotta pots before you plant. This easy process will help eliminate the possibility of fungal or bacterial diseases that may develop.
Soak the pot(s) in a solution of ten parts water to one part bleach or hydrogen peroxide. I like to use my kitchen sink but you can use a plastic bucket or basin. Allow the pots to soak for a minimum of 3 hours or you can leave them in the solution overnight if you prefer. After the pots have soaked, put on your rubber gloves and use a stiff bristled scrub brush to thoroughly scour the pot, inside and out. Rinse the pot and allow it to dry.
Your pots are now ready, and your new plants will have a great growing season!
Ditch the Dryer Sheets…Freshen Laundry Naturally with Herbs

Ditch your dryer sheets and embrace the latest trend in simple, sustainable living…dryer sachets! These chemical-free, all-natural alternative to dryer sheets have been growing in popularity as people try to eliminate unnecessary chemicals from their homes, but have you ever wondered how they work? In this week’s column, I’ll tell you why they work and show you how to make your own.
What Is A Dryer Sachet And Why Does It Work?
A dryer sachet is a lot like any other sachet, it’s a bag or pouch made of porous fabric that is filled with fragrant herbs. What distinguishes dryer sachets from their culinary counterparts, is the type of herbs that are used in it. Most dryer sachets are made exclusively with lavender because it is a highly fragrant herb that eliminates static cling, and the residual smell left on clothing, repels moths. I’ve added fragrant rose petals in the custom herbal blend below, because I enjoy the light scent in combination with the lavender.
Dryer Sachet Herb Blend
The ingredients for this dryer sachet mix are gentle enough for sensitive skin and can be used when laundering children’s and infant’s clothing.
You’ll Need:
- 1/4 c. dried rose petals
- 1/4 c. dried lavender buds
- 4-5 drops lavender essential oil (optional)
- 1 dryer sachet*
*Dryer sachets can be purchased online or you can make your own using an old sock or stockings. You can also sew your own reusable and refillable dryer sachets, using fabric scraps or an old t-shirt.
Assembly:
Place the herbs in the dryer sachet of your choice and add the essential oil drops. If using an old sock or stockings, add the herbs and securely tie the end, or ends, into a knot. If you have enough fabric, you can tie a double knot to be safe.
To Use:
Each sachet can be used 7-10 times (the sachets can be used more than 10 times if you don’t mind a reduction in scent). Before each drying cycle, remove the sachet and pinch it between your fingers a few times, to release the herbal essences.
When you’ve used the bag and no longer notice a strong scent in your laundry, you can deodorize and freshen your vacuum cleaner by sprinkling the herbs on the floor and vacuuming them up!